
- Tue Nov 20, 2012 11:08 pm
#158558
Last Updated: August 20, 2015
A couple months ago I did some water propagation with a few leaf pullings/flower stalk cuttings.
They sat under T5's for somewhere between 2 and 3 months before being potted.
- Update, new progress photos, 3 months after this post:
http://www.flytrapcare.com/phpBB3/water ... ml#p165321
Before we get to the pics, a number of people have asked how I went about this process. Here's a step-by-step:
Materials:
Soil-based propagation instructions can be found here: Cloning flytraps at home (non-TC vegetative propagation)
Click any image for the larger version.
Here are a few still underwater, where they've been sitting undisturbed for months:
 IMG_2139.JPG (413.34 KiB) Viewed 23124 times
[/url]
IMG_2139.JPG (413.34 KiB) Viewed 23124 times
[/url]
IMG_2143.JPG (419.19 KiB) Viewed 23124 times
[/url]
IMG_2145.JPG (417.14 KiB) Viewed 23124 times
[/url]
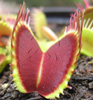
FTS Maroon Monster showing strong initial root growth (you can see the fuzzy rootlets growing off the main root, which are what give flytrap roots their "blackened" appearance)
IMG_2147.JPG (493.05 KiB) Viewed 23124 times
[/url]
IMG_2150.JPG (567.12 KiB) Viewed 23124 times
[/url]
IMG_2151.JPG (524.56 KiB) Viewed 23124 times
[/url]
Just after potting:
IMG_2181.JPG (635.52 KiB) Viewed 23124 times
[/url]
10 days later
IMG_2193.JPG (1 MiB) Viewed 23124 times
[/url]
Typical flower stalk with newer callouses just starting to show signs of growth:
IMG_2153.JPG (412.95 KiB) Viewed 23124 times
[/url]
IMG_2155.JPG (365.24 KiB) Viewed 23124 times
[/url]
10 days later:
IMG_2191.JPG (1.05 MiB) Viewed 23124 times
[/url]
B52 - more great rootlet detail here, especially in the first photo:
IMG_2162.JPG (460.82 KiB) Viewed 23124 times
[/url]
IMG_2161.JPG (421.26 KiB) Viewed 23124 times
[/url]
IMG_2159.JPG (391.44 KiB) Viewed 23124 times
[/url]
IMG_2163.JPG (475.87 KiB) Viewed 23124 times
[/url]
IMG_2164.JPG (439.71 KiB) Viewed 23124 times
[/url]
Just after potting:
IMG_2174.JPG (851.62 KiB) Viewed 23124 times
[/url]
10 days later:
IMG_2188.JPG (1.03 MiB) Viewed 23124 times
[/url]
Another B52, this one was just a small piece of an attempted leaf pulling gone wrong. I had almost thrown it out:
IMG_2167.JPG (365.84 KiB) Viewed 23124 times
[/url]
10 days later:
IMG_2189.JPG (1.03 MiB) Viewed 23117 times
[/url]
Wacky Traps, 10 days after potting (original pics are all too blurry to share):
IMG_2190.JPG (1.05 MiB) Viewed 23124 times
[/url]
A Bristletooth-like seed-grown I received from JHT-Union:
IMG_2169.JPG (433.59 KiB) Viewed 23124 times
[/url]
IMG_2173.JPG (378.81 KiB) Viewed 23124 times
[/url]
10 days later:
IMG_2195.JPG (1013.01 KiB) Viewed 23124 times
[/url]
The whole family, just after potting:
IMG_2184.JPG (1.24 MiB) Viewed 23124 times
[/url]
10 days later:
IMG_2187.JPG (1.32 MiB) Viewed 23124 times
[/url]
Ziploc bag as humidity/acclimation dome:
IMG_2185.JPG (1.34 MiB) Viewed 23124 times
[/url]
A couple months ago I did some water propagation with a few leaf pullings/flower stalk cuttings.
They sat under T5's for somewhere between 2 and 3 months before being potted.
- Update, new progress photos, 3 months after this post:
http://www.flytrapcare.com/phpBB3/water ... ml#p165321
Before we get to the pics, a number of people have asked how I went about this process. Here's a step-by-step:
Materials:
- Distilled water (room temp, not refrigerated) - available at any major grocery store by the gallon, and just as cheap as other water. You should use one that is still factory sealed. This reduces the chance that there are any contaminants, bacteria, etc. inside the bottle.
- Plastic wrap
- Toothpick
- Rubber band
- Plastic ziploc container or small plastic tub, around 4-6 inches tall. It must not have drainage holes, and does not have to be clear.
- Optional: If taking multiple pullings from various cultivars like I did, you will also need a way to separate the pullings so you don't get mixed up. I used a seedling container like the black one seen in the photos above. If the seedling container doesn't have drainage holes, add them yourself. The seedling container should be placed inside the water container.
- Optional but recommended: An artificial light that you would trust to start plant seeds of any kind. If you don't have an artificial light, you can use direct sunlight, but I have not done this successfully. In my case, direct sunlight caused heat problems immediately. We'll talk a little bit more about trying this with sunlight during the actual steps below.
- Make sure your plastic tub and optional seedling container are clean - you don't need to sterilize, or at least I didn't, but wash them (and your hands) with Dawn/Palmolive, etc. in warm/hot tap water like you would any dirty dish. Rinse them with warm/hot tap water, then open the factory-sealed distilled water bottle and re-rinse them with room-temperature distilled water.
- Bonus: If you have a dishwasher, a no-soap run on the top rack on high heat will sanitize the container(s) for you - I've never had even flimsy containers melt, but keep in mind that some plant pots are not dishwasher-safe, and will not be labeled as such even if they aren't. Wash your hands again before removing from the dishwasher.
- If using a seedling container, put the seedling container inside the plastic tub.
- Fill 3/4 full with room temp distilled water.
- Take standard pullings/cuttings from your flytraps/drosera/etc of choice.
- Drop them into the tub/container and label as necessary. I taped the seedling container in place with standard clear office tape and wrote on the outside of the plastic tub.
- Dunk any cuttings that are floating, as that often causes them to sink to the bottom. If any are stubborn and really want to float, fine, let em. Just keep an eye on those pieces that refuse to sink over the next few weeks as those may get mold/fungus above the surface.
- Take a piece of plastic wrap and the rubber band and seal the container. Do not poke holes in the plastic wrap.
- Place the container under your artificial light, but not so close that the water gets heated up much by the light. Place it as though it's a flytrap seed pot - pretend the top of the water is the top of soil that has flytrap seeds on it (even though most of your cuttings are probably at the bottom of the tub). You just need to make sure it's not so close that the water is too far inside the light's heat. If the water heats up too much, the pullings cook and the whole thing fails. In my case, the water line was 10 inches from the bulbs, and the pullings were at the bottom of 3-inch-deep water, so the pullings were ~13 inches away from the bulbs.
- If planning to use sunlight: As I said above, sunlight can cause heat problems in the water, but if you can give your pullings/cuttings sunlight without allowing the water to heat up to hand-warm, go for it (if it feels warm to the touch, it's too warm). You should be able to use a shelf in your greenhouse, plain and simple. If you don't have a greenhouse, try using sunlight indoors via a sunny window. You may have to use a shade cloth, etc. to try to block some of that deadly heat, especially in summer months when the windowsill is warmer. - I used a 16/8 light cycle under T5's, but 14/10 or 12/12 would work, too. I do not recommend a 24 hour light cycle here - that's only for pre-germination seeds.
- Wait. I checked it for the first time after a month, then every other week. You don't have to leave them as long as I did, but they should at least have some sign of actual growth beyond calluses.
- Water level checks/adding water: If the water level is dropping or you don't have it covered/sealed, use a coffee filter to add water so water just drips into the container. Dumping in water via a cup or watering may disturb the cuttings. Mine was sealed pretty well with the plastic wrap and a rubber band; I never refilled water, nor removed the plastic wrap for the entire duration. - Once you've got confirmed plantlets (I wait until I see an actual trap or two), remove carefully and pot them in flytrap soil (e.g. peat/perlite or peat/silica sand). Use a water tray and fill the tray with water, like you would any flytrap pot.
- Put a large ziploc bag upside down over the new pot for 7-10 days with no holes or cuts in it - the ziploc bag should be "loose" at its base, not sealed with a rubber band, nor so small that it's hugging the edges of the pot. Remove and immediately replace the bag every few days to cycle in new air. Keep the bag as "open" as you can so as much air as possible is inside (don't allow it to collapse on itself for days on end - prop it up with a stick if you have to). This allows them to slowly acclimate to living in the air while keeping the humidity high since they're accustomed to living underwater. Without the ziploc, most if not all will dry up and die in a day or two.
- Side note about the pulling/cutting "leftovers": Do not remove the stalk/pulling, or cut it in any way, as the plantlets are using the stalk piece that's under the soil in lieu of having their own established root system. Let it die off on its own. You can safely cut off entire black portions (such as dead traps or the very tops of flower stalks), but under no circumstances should you cut into any live tissue. You will kill your plantlets this way. - After 10 days, cut 1-inch triangles off of each of the two top corners of the upside-down ziploc to let some humidity start escaping out the top. Now we're acclimating to lower humidity.
- Throughout this process, don't let the water tray dry out but don't refill it daily - only refill the tray when it's empty. Watch for mold/fungus - if you see some, dump the water tray and open the bag just a bit more at the top. You'll need to keep the soil a bit drier than you have been. Hopefully, this won't cost you any of the plants due to trying to acclimate them too fast.
- Continue opening the bag bit by bit every week. After 4-6 weeks, remove the bag.
Soil-based propagation instructions can be found here: Cloning flytraps at home (non-TC vegetative propagation)
Click any image for the larger version.
Here are a few still underwater, where they've been sitting undisturbed for months:
FTS Maroon Monster showing strong initial root growth (you can see the fuzzy rootlets growing off the main root, which are what give flytrap roots their "blackened" appearance)
Just after potting:
10 days later
Typical flower stalk with newer callouses just starting to show signs of growth:
10 days later:
B52 - more great rootlet detail here, especially in the first photo:
Just after potting:
10 days later:
Another B52, this one was just a small piece of an attempted leaf pulling gone wrong. I had almost thrown it out:
10 days later:
Wacky Traps, 10 days after potting (original pics are all too blurry to share):
A Bristletooth-like seed-grown I received from JHT-Union:
10 days later:
The whole family, just after potting:
10 days later:
Ziploc bag as humidity/acclimation dome:
 - By Supercazzola
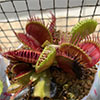 - By stephenboss2000
 - By MikeB
 - By ChefDean