
- Fri Dec 02, 2011 8:48 pm
#126183
Hey Everybody,
It's been a while. I've been busy and distracted with other things. I decided back in October that I was most likely going to let the plants ride bareback through the winter. So far is seems like a good decision. This fall has been pretty mild overall...and still is up to this point. The last 3 falls/winters have been quite treacherous for this area, so it was a judgement call that seems to have panned out well.
So far I have not been using the fill/drain setup. Just been pumping water out of the reservoir and from the planter area into the reservoir....helps reduce TDS in the res, mainly, I think, from the mosquito dunk. We'll see how it all plays out when things warm up next year. The tds in the bottom of the self-watering pots stays below 20 ppm these days (coir/sand) and below ~10 ppm for the peat/sand.
Still things that I need/want to do for my own convenience....like install float switches.
I was planning on doing a lot more in prep for winter. Maybe I will do some next year, but for now it's just going to ride it out as pictured earlier. If things turn really bad....then I'll need to scramble around a bit.

But taking pix and sharing online is half the fun!
It's been a while. I've been busy and distracted with other things. I decided back in October that I was most likely going to let the plants ride bareback through the winter. So far is seems like a good decision. This fall has been pretty mild overall...and still is up to this point. The last 3 falls/winters have been quite treacherous for this area, so it was a judgement call that seems to have panned out well.
So far I have not been using the fill/drain setup. Just been pumping water out of the reservoir and from the planter area into the reservoir....helps reduce TDS in the res, mainly, I think, from the mosquito dunk. We'll see how it all plays out when things warm up next year. The tds in the bottom of the self-watering pots stays below 20 ppm these days (coir/sand) and below ~10 ppm for the peat/sand.
Still things that I need/want to do for my own convenience....like install float switches.
I was planning on doing a lot more in prep for winter. Maybe I will do some next year, but for now it's just going to ride it out as pictured earlier. If things turn really bad....then I'll need to scramble around a bit.
Alan81 wrote:It looks great! thanks for share it with usSome are 50/50 peat/sand, some are 12/5 coir/sand (Eco Earth).
What is the composition of the substrate you are using for VFT? Do you use peat? or just sand? or a mixture of both?
Cheers!
Steve_D wrote:The project looks great, the plants look very healthy and happy, and that Korean Melody Shark Venus Flytrap surely colored up nicely. Great job, naja002!Thanx, Steve. I agree on the KMS...I was surprised when I first noticed it. They should all get plenty of sun during the growing season....some indirect for an hour+ in the mornings and some dappled starting mid-evening. I am hoping that they pull through the winter well and take off this growing season!
steve booth wrote:I like many others have been following this thread, hanging on every word and waiting with anticipation for the next installment.Not a problem, Steve. I appreciate your interest and just glad that I could share with you and others. The project isn't necessarily "done", but it is done for now. I'm a bit burned out on it, so I just need to maintain it while I get away from it for a while.
Well now its done it looks marvellous and obviously does a great job. I am pleased for you and thank you for the ideas it must have put into many peoples heads.
Cheers
Steve
jwbates26 wrote:This is a very interesting project. Thank you for the detailed updates with pictures can't wait to see the end results. It would be nice to have all the tools and means to take on projects like this. Keep up the great work.Many Thanx! I am fortunate enough to have a few tools, a few $$$ and a place to do this kind of stuff. If I was unable to tinker around with things...I think I would go bat-shat crazy!
Daniel_G wrote:Looking good!Thanx!
Eric wrote:Hm... May I suggest that rather than use mosquito dunks you plant aquatic carnivores in the water? Seems pretty cool to me.That's an idea that I had not considered. Not sure if I will pursue it, but it is on the block. The main goal is to prevent the mosquito larvae from maturing, so what would I use for that....???
Alan wrote:Your bog is absolutely incredible and your plants are equally impressive and beautiful!Many Thanx! As stated earlier...it's done for now, but not necessarily done!
swat007j wrote:So how many b-52 you have? nice i love VFT none of mine have that Red color in the mouth yet i cant wait i see some pink thoI think I have ~13, maybe a few more the way Matt and Steve toss in extras!
that-smith-kid wrote:Cool daddy long leg kill!That's just one. Seems like the daddy long legs is going to be a staple part of their diet. No idea where they all came from, but there is plenty of them!
Naja002 liked this


 Not only did they have the 13 pots that I needed in order to completely fill the planter bog...they had them in the lighter cream color that I have been wanting.


 - By MikeB
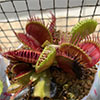 - By stephenboss2000