FlytrapCare Carnivorous Plant Forums

Sponsored by FlytrapStore.com

Ask questions about terrariums, mini bogs, greenhouses and other growing environments

Moderator: Matt

By renesis
Posts:  374
Joined:  Tue Apr 21, 2009 7:37 pm
#22529
Thanks everyone!!

I need to add another update, I know I said I was done for the time, but an issue came up that required some creativity.

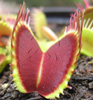
The heliamphora as I'm sure most of you know need cooler temperatures than most other plants, and seeing that its currently my favourite in the tank, I need it to thrive and all others to adapt. Unfortunately, after recieving it, it was getting temps in the 30s (celsius) and 2 of the 4 pitchers started browning :(

After getting into the terrarium, the thermometer was logging daytime temps of as high as 35! So, this had to change.

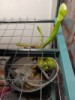
I mentioned adding a plexiglass layer between the tank and the lights as I had one on my small tank and temps rarely went over 28. So, having some spare glass around, I used that temporarily until I could go get a piece of plexi large enough. Next morning, look at the tank and the glass cracked from the heat + weight of the lights, and had a shard pinning a flytrap and pitcher down!

So, went out and got the plexiglass. After putting that in place, temps went down to ~28, and humidity went to 100% and I had condensation all over the glass. That won't work! Temps still on the higher side, and what use is a terrarium if I can't see the plants. So, I whipped out the dremel and came out with this:
img057.jpg
img057.jpg (129.23 KiB) Viewed 5358 times
A square cut-out for a PC fan, and some drilled vents that line up with the aquarium hood. The fan pulls air out of the tank, while the holes pull in fresh air as a result.
img059.jpg
img059.jpg (114.19 KiB) Viewed 5358 times
The fan was then glued and sealed in:
img063.jpg
img063.jpg (112.69 KiB) Viewed 5358 times
So, that fan is set onto a timer now. I have it turning on for half an hour every 3 hours- but will likely adjust that to get a better balance.

For the temperatures, the biggest factor was the lights heating it up - especially the CFL bulbs. The plexiglass dropped the temps, but not enough. So while i was playing with PC fans, I glued a couple more onto the vents on top of the aquarium hood. And then cut up a pair of square 4" pots to use as a shroud.
img065.jpg
img065.jpg (98 KiB) Viewed 5358 times
img067.jpg
img067.jpg (82.69 KiB) Viewed 5358 times
I haven't quite figured out how to make it a bit prettier- but I will come up with something! The important thing is, the lights are cool now! Most of the heat generated by the CFLs are removed, I'd estimate a good 75% of it is blown out. Tank temperatures after lights and fans are running for >6h, 25C ! Much better!

The two vent fans are set up on the same timer as the lights, and since they are more or less isolated from the tank by the plexiglass layer, do not have any observed effect on the humidity.
img068.jpg
img068.jpg (86.2 KiB) Viewed 5358 times
Fan from below. Gotta love that light intensity!
img061.jpg
img061.jpg (191.94 KiB) Viewed 5358 times
There we go! Can see the plants again, and temps are more friendly to the heli!

So- overall, a lot more involved than the smaller tank where I could just move the lid to adjust the humidity and temps as I saw fit. But, I'm always up for a challenge, and this one "should" be more or less complete. Going to add a couple more droseras in to fill it in a bit, and still need to scatter some seed. Otherwise, next update in a month or two when its grown up a bit!

Thanks again for all the positive feedback!
By hackerberry
Location: 
Posts:  1704
Joined:  Fri Feb 13, 2009 7:58 pm
#22531
Crazy man, that's the setup that I'd like for my Cephs, Helis and Highland Neps.

hb
By Nickrober
Location: 
Posts:  427
Joined:  Mon Mar 30, 2009 12:07 am
#22532
Awesome setup! The fans are really cool.
By watnazn
Location: 
Posts:  426
Joined:  Tue Jun 02, 2009 3:52 am
#22562
Great job, the fix still makes the tank look clean and tidy. If I tried I would make a mess.
By renesis
Posts:  374
Joined:  Tue Apr 21, 2009 7:37 pm
#22765
hackerberry wrote:Crazy man, that's the setup that I'd like for my Cephs, Helis and Highland Neps.

hb
It might have the potential to work quite well for that. If my heli recovers and makes it, I may consider adding a ceph to my collection maybe next year if I can get a hold of one. The temp at nights drops to around 17-19C as the tank is in the basement as well.
Nickrober wrote:Awesome setup! The fans are really cool.
Thank you!
watnazn wrote:Great job, the fix still makes the tank look clean and tidy. If I tried I would make a mess.
Haha, I tried. I still don't like it though. Might shorten the pots, or add some sort of a cover with the vent at the back to make it look better. I'm sure I'll think up something eventually. For now, its just enjoying what's inside and tweaking with the timers to get the humidity right.
By ReefPlant
Location: 
Posts:  392
Joined:  Sun May 03, 2009 3:58 am
#24431
Nicely done on the setup!!!
:mrgreen:
Your plants really look awesome in there. Keep me posted!
Good luck!
By Veronis
Location: 
Posts:  2202
Joined:  Fri May 29, 2009 8:41 pm
#24435
I love it. :) Great job.

What's the long-leafed twisting plant in the back right-hand corner?
By renesis
Posts:  374
Joined:  Tue Apr 21, 2009 7:37 pm
#24473
ReefPlant wrote:Nicely done on the setup!!!
:mrgreen:
Your plants really look awesome in there. Keep me posted!
Good luck!
Thanks! I'll definitely put up some new pics in a bit. The plants have more or less settled in, and the lighting seems more than adequate. The akai ryu that stayed mostly green on my window sill has even begun to colour up! As for temps and humidity, the heli looks like it has finally acclimated and stopped dying, hoping for some new pitchers soon.
Valydius wrote:I love it. :) Great job.

What's the long-leafed twisting plant in the back right-hand corner?
Thanks!

All of them in the back are Tillandsias, they weren't labeled when I got them, but if I had to guess- I think the one you're referring to is Tillandsia medusae
Matt wrote:Quick question renesis:
How are you powering those computer fans? They usually have the special plastic end that attaches to the mother board. So how did you convert that to take normal AC power?
Yep, you are right. I cut off the plastic ends and wired them to a 12V transformer. They are on 2 seperate lines, the two cooling fans up top on one, and the one on the plexiglass to control humidity on another. I just used a pair of transformers I had laying around that had the right rating (12v and enough amperage). Then, these are plugged into timers- the cooling fans whenever the lights are on, and the humidity/circulation fan for a couple of hours per day (at 4 different intervals).

The one on the plexiglass is a 3-wire fan, the type found cooling the CPU. This just means it has 2 speeds, low and high- you could wire them for either or have a switch to use both speeds. The ones up top are just the regular 2-wire single speed cooling fans. IIRC, each one uses around 150 milliamps.

I can take pictures if you'd like, but it shouldn't be too difficult.
By Veronis
Location: 
Posts:  2202
Joined:  Fri May 29, 2009 8:41 pm
#24474
Matt wrote:Quick question renesis:
How are you powering those computer fans? They usually have the special plastic end that attaches to the mother board. So how did you convert that to take normal AC power?
I can't say for certain that renesis and I do it the same way, but here's how I do it in case it will help anyone. Renesis' method may be simpler so I'm interested in his response as well. :)

You need the specs of the device you're running (in this case a computer fan, so usually about 0.3 to 0.6 Amps, and DC 12V).

1. Cut the computer fan cable at its computer connector so you have two wires (keep these wires as long as possible, so cut the computer connector off as close as you can). The now-cord-less computer connector goes in the trash. If it's a variable speed computer fan, make sure you cut the right set of wires! You need to cut the power wires, not the wires that connect to the speed controller/dial.
2. Attach those two computer fan wires via electric tape to a the two wires of a male socket connector (available at Radio Shack - they have stores all over plazas and shopping malls) - mine is black, as shown in the picture below of it connected to the fan. Don't let the two parallel wires touch each other. Meaning in this case I connected the + (red) computer fan wire to the + (white-striped) male socket wire and taped them. Then connect the other two and taped them. Tape them separately so that the + and - wires' interior copper never come into contact with each other. Otherwise the fan won't operate.
3. You then need an AC adapter (also from a place like Radio Shack) that will support the amperage you're using (0.3 to 0.5 amps, they'll be able to tell you based on the specific fan you're trying to power as long as you know about how many amps it uses); typically one with an output of 0.5A (500mA) will do. I've added two screen shots for the white one I use, one pic of the back of it and its connector at the end of the wire (two-prong female socket), and one pic with the back/inside of it which contains some specs about it.
4. Once you plug the two-prong male/female pieces together (one orientation will run the fan, the other orientation won't), you just plug the AC adapter into an electric outlet and viola. Wind.
Attachments:
Closeup of the male socket connector that's electrical-taped to the computer fan.
male socket closeup.jpg (75.54 KiB) Viewed 5268 times
This is electrical-taped to the fan after you cut the computer connector off the end of the fan wire.
male socket and fan.jpg (172.18 KiB) Viewed 5268 times
Inside of the AC adapter I use.
AC adapter inside.jpg (152.73 KiB) Viewed 5268 times
You can see the two-prong female connector here, which plugs into the black male socket shown in the first two pics.
AC adapter back.jpg (81.74 KiB) Viewed 5268 times
Last edited by Veronis on Wed Nov 11, 2009 2:16 am, edited 3 times in total.
By twigs
Location: 
Posts:  244
Joined:  Thu Jun 25, 2009 7:23 pm
#24546
Sounds like this project is coming along great.

Beautiful setup you got there. I have some Heli's on the way and I'm thinking I might have to do something like this.
By Ae9803
Location: 
Posts:  532
Joined:  Mon Mar 08, 2010 2:55 am
#82431
Yea, I just successfully did it as we speak! I can walk you guys threw it if you need help! Let me know!
Not what you would expect...

ant hill? No, He hates ants. But I am pretty sur[…]

Sarracenia ID

They're either leucophylla or x moorei (flava x l[…]

I will need to check out our local TJ's. Normally […]

Order received. Your order number is 1642. I'll PM[…]

Rescue Sarracenia Rosea?

This was the shipment that arrived while I was the[…]

What’s happening

It was rot Im not sure if it was root rot or crown[…]

Congrats on being a new flytrap owner! The trap wi[…]

SASE received. Order is fulfilled. Return envelope[…]

Support the community - Shop at FlytrapStore.com!